
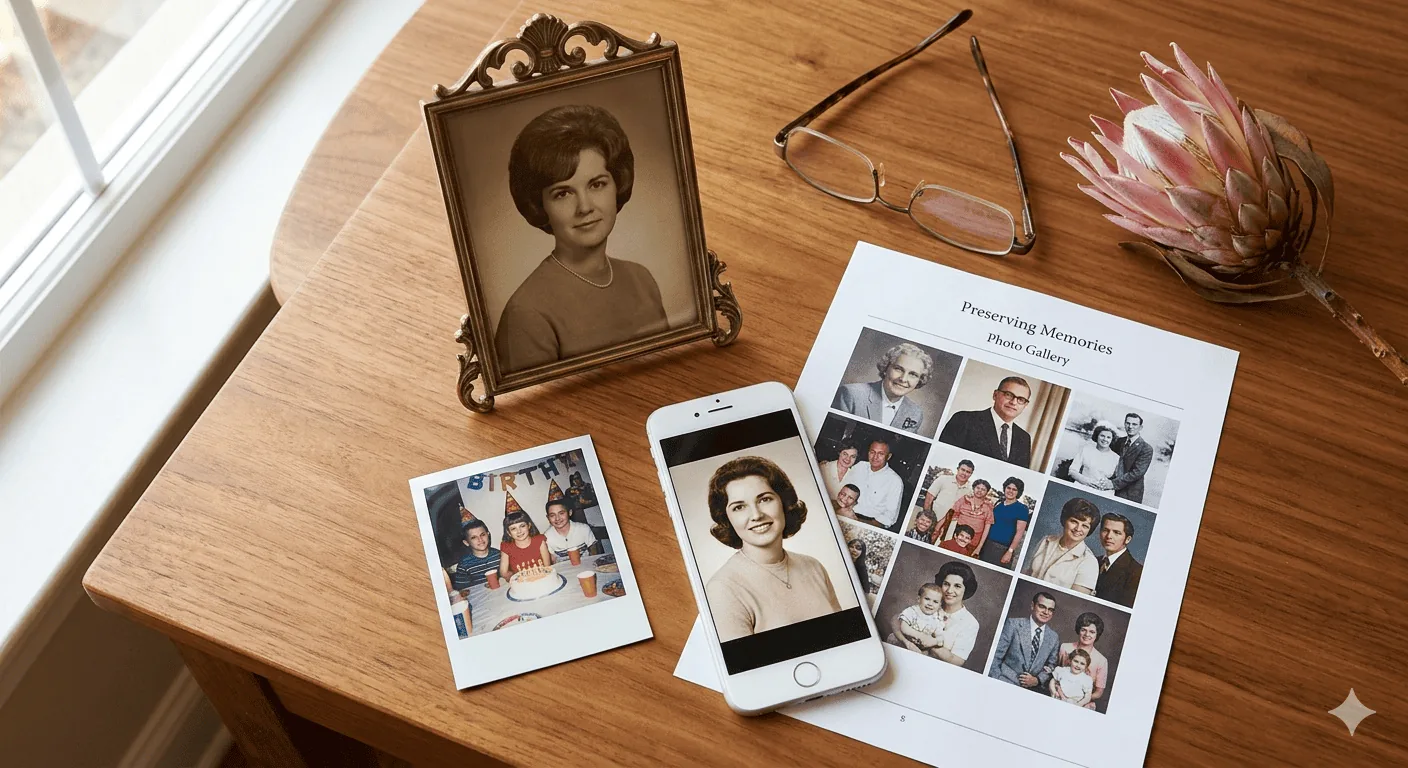
Most families do not begin with perfect digital photos. They begin with whatever they can find in the first day or two: an old framed portrait, pictures buried in a WhatsApp thread, or a church photo someone sends late at night. This guide starts with those real problems first, then shows how TributePoint helps you turn those images into something clear enough for a memorial page, a funeral programme, and family sharing.
Why Photos Matter on a Tribute Page
When a family member opens a tribute, the first thing they see is the main photograph. It sets the tone for the entire memorial. A blurry snapshot or a cluttered background can distract from the person you are honouring. TributePoint is designed to help you present clear, beautiful images — even if all you have is a phone camera photo taken at a family braai.
Research shows that visual memorials help with the grieving process. Seeing a loved one’s face in familiar settings makes the tribute feel personal and authentic — not clinical. That is why TributePoint includes tools that would normally require expensive software.
Uploading Photos
The first challenge is usually not editing. It is simply gathering the right images fast enough. One relative has the recent portrait, another has childhood photos, and someone else is sending screenshots from Facebook or WhatsApp. A good tribute workflow should make it easy to pull those together without losing track of which version is best.
Drag-and-Drop or Click
The photo uploader supports both drag-and-drop and traditional file selection. Drop one photo or twenty at once — TributePoint handles the queue. Files are processed in the background so you can continue editing the tribute while photos upload.
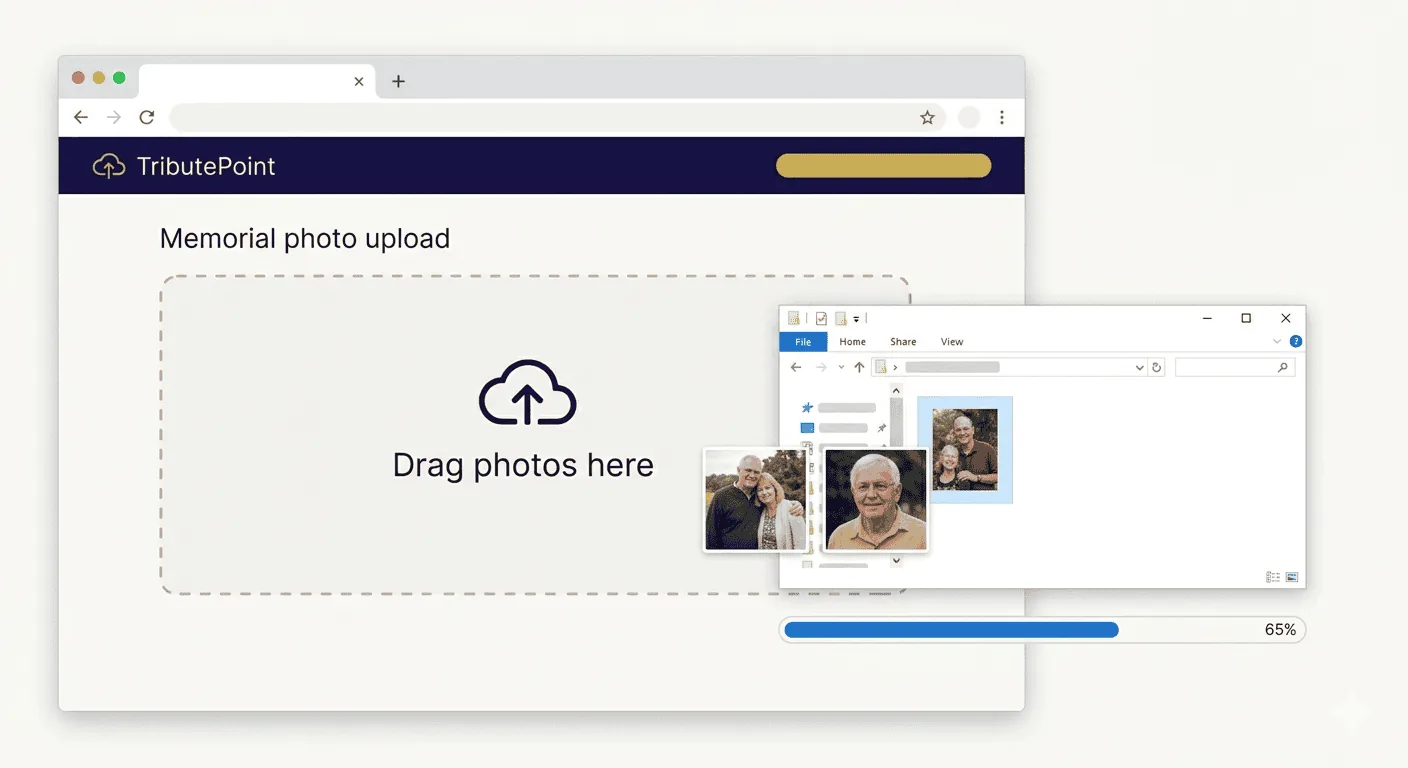
If you are uploading from a phone on mobile data, TributePoint automatically compresses large images before sending them. This saves your data bundle and speeds up the process.
Supported Formats
TributePoint accepts JPEG, PNG, and WebP images. Most phone cameras save in JPEG by default, so you rarely need to convert anything. If you have an old scanned photograph in an unusual format, simply screenshot it on your phone and upload the screenshot.
The Photo Gallery
Once uploaded, photos appear in a grid gallery. Each photo gets a thumbnail so you can see all of them at once. The gallery shows a count badge — for example "12 Photos" — so you always know how many images the tribute contains.

Reordering Photos
The order in which photos appear on the memorial page matters. Maybe you want the most recent portrait first, followed by family group photos, and then older images from their youth. Simply drag any photo to a new position and the order saves automatically.
Setting the Main Photo
One photo serves as the main image for the tribute. It appears on the dashboard card, in shared links, and as the large hero on the memorial page. Click “Set as Main” on any photo to promote it. The change saves instantly via AJAX — no page reload needed.
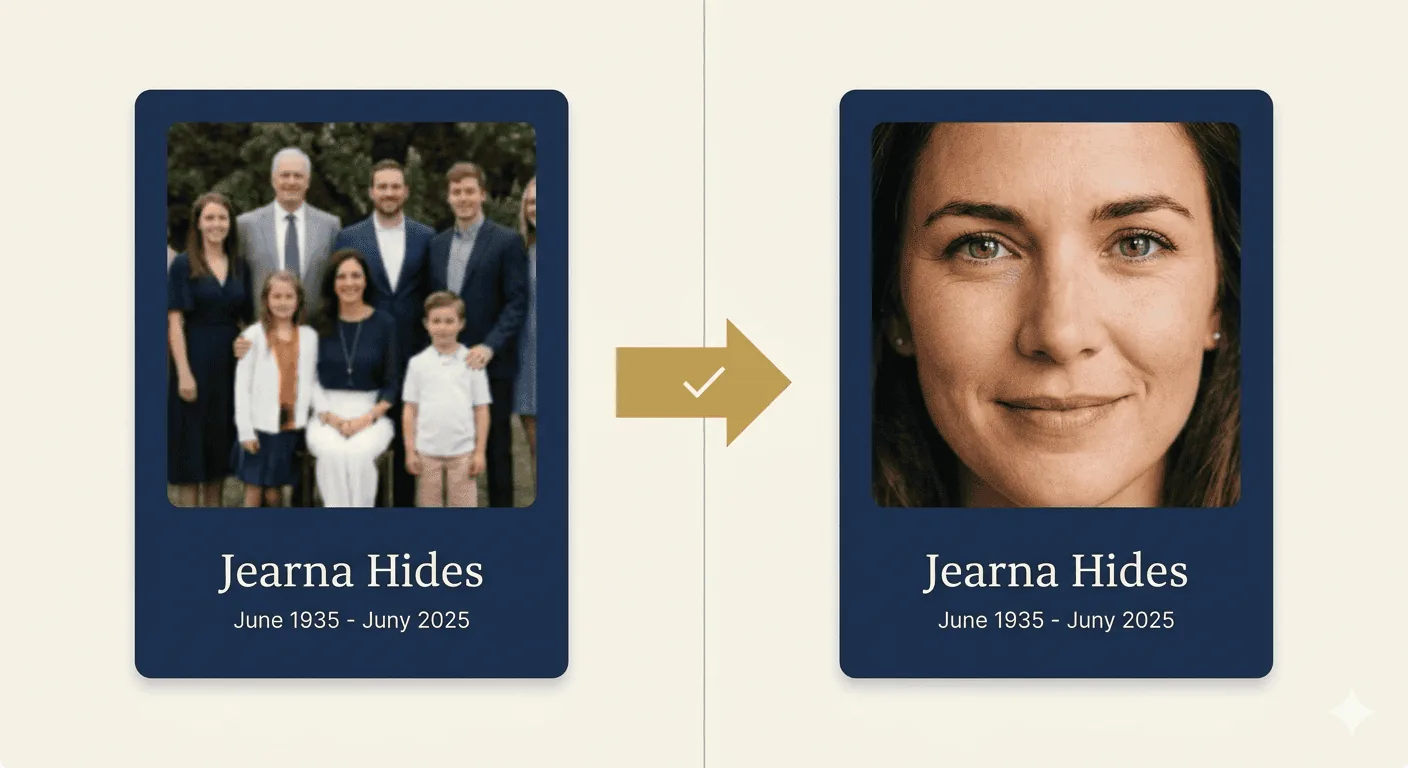
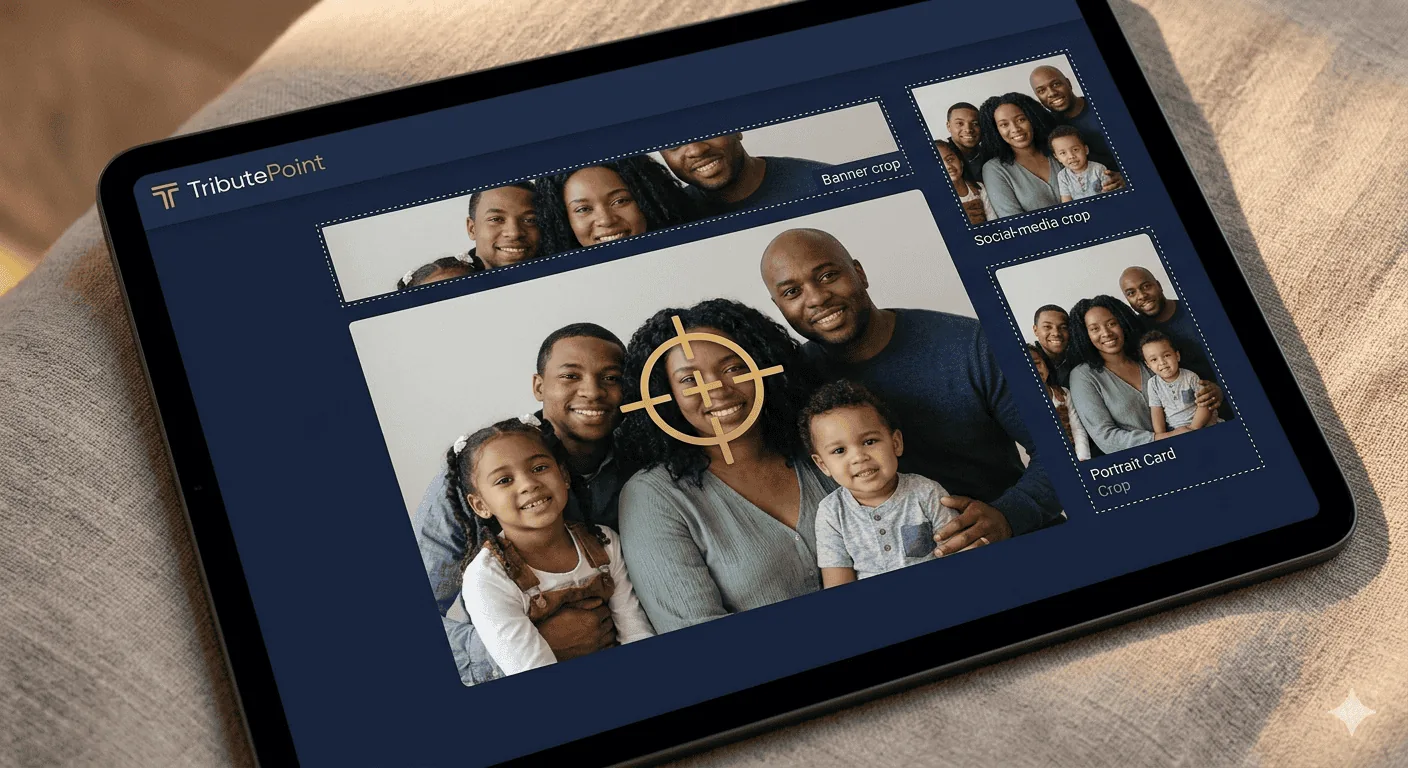
Focal Point Selector
Different devices crop the main photo differently. On a phone, the memorial might show a tall slice of the image; on a desktop, it shows a wide one. The focal point selector lets you click on the most important part of the photo (usually the face), and TributePoint will always crop around that point.
Click anywhere on the main photo to set the focal point. A small crosshair appears where you clicked. The coordinates save instantly. Every theme on TributePoint respects this focal point when displaying the image.
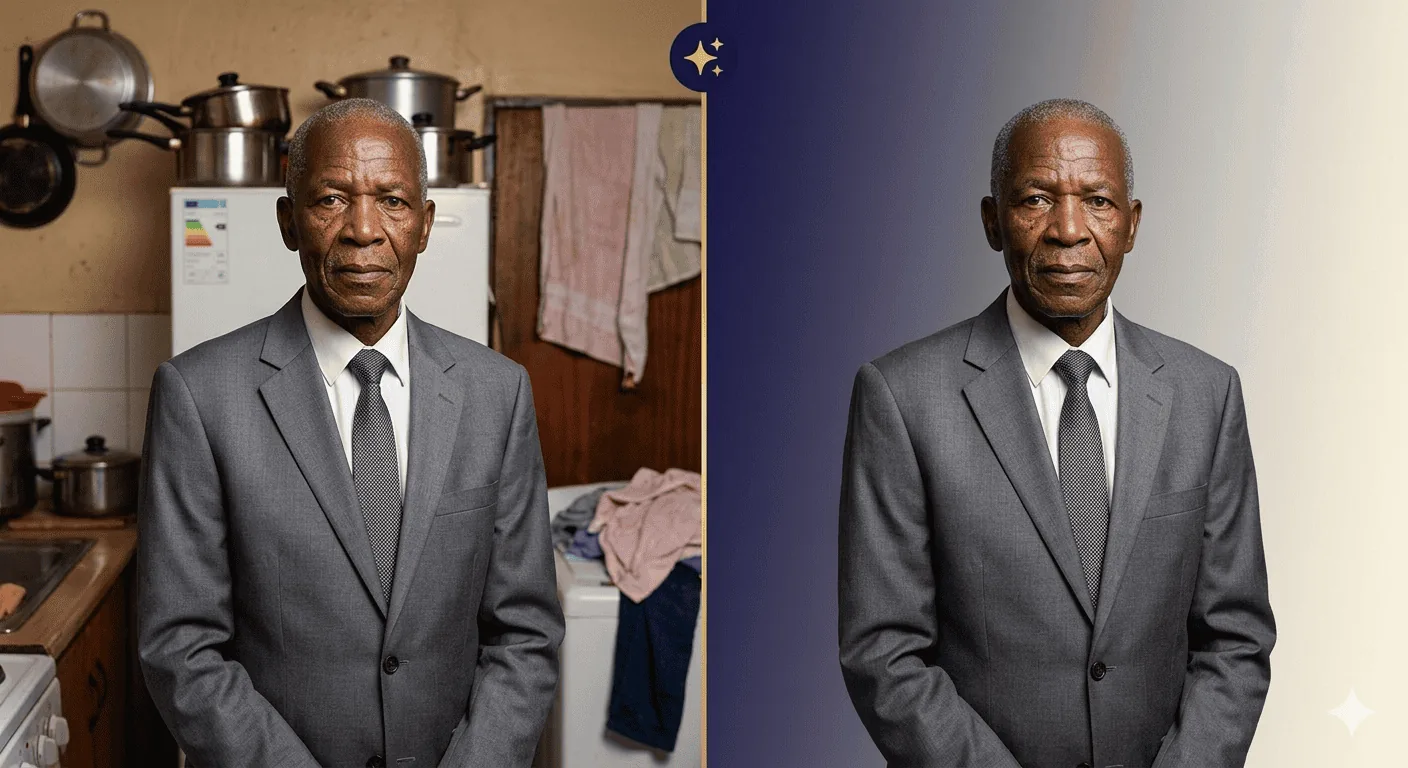
AI Background Removal
Sometimes the only usable photo is not ideal. The clearest picture of Gogo might be from a family lunch with half the table in view. Dad’s best portrait might have been taken in a lounge with a busy wall behind him. In that kind of situation, background removal is helpful because it lets the person stay central instead of letting the room tell the story.
When to Use Background Removal
- Cluttered backgrounds — market stalls, furniture, other people
- Mismatched colours — a bright background that clashes with the memorial theme
- Group photos — isolate one person from a family gathering
- Old scans — remove stains, tears, or yellowing from the background
The Cutout Editor
Sometimes the AI gets close but leaves a sliver of background near the ear, or removes part of a hat brim. The cutout editor gives you full manual control:
Eraser
Brush away remaining background pixels
Restore
Bring back pixels the AI removed by mistake
Crop
Trim the image to focus on what matters
Undo / Redo
Up to 30 history states — never lose your work
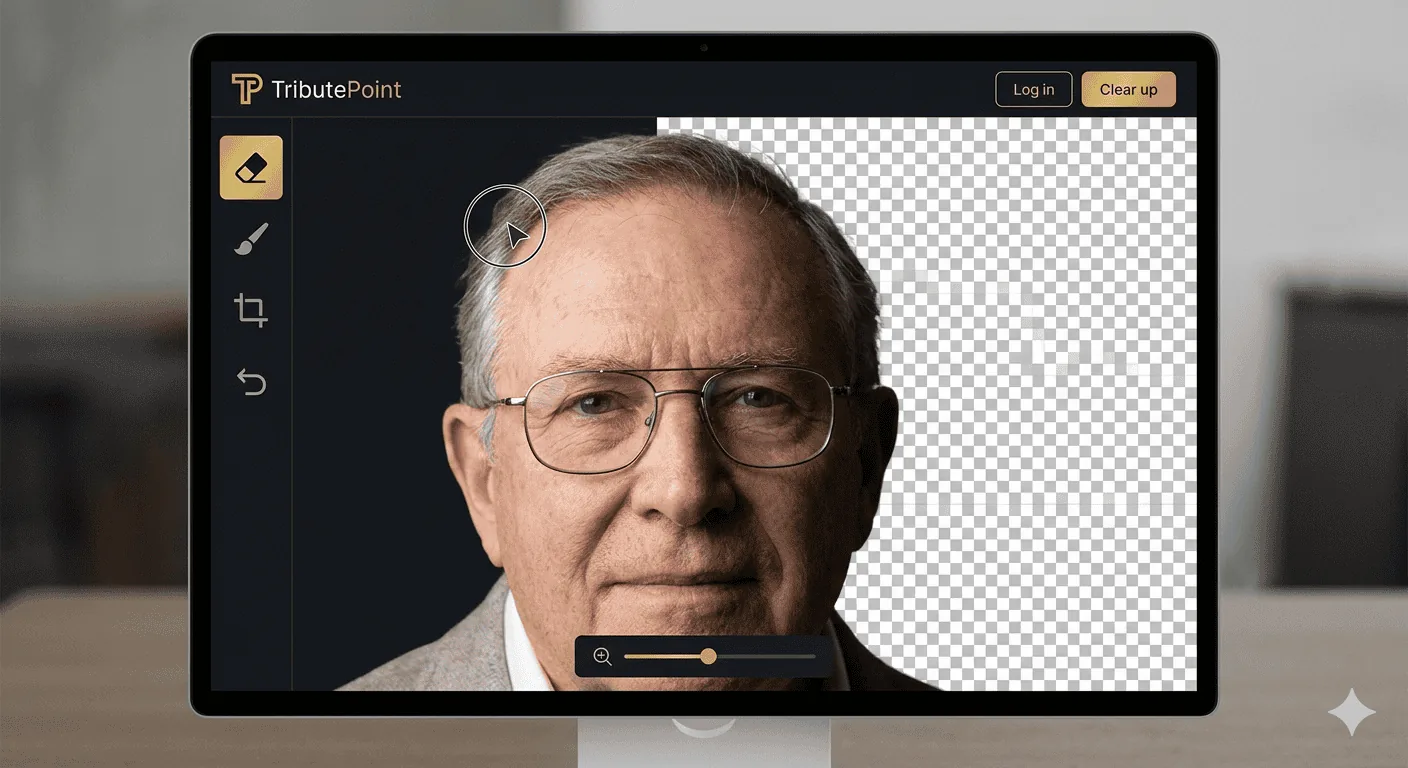
The editor runs in a full-screen canvas. You can zoom in and pan to work on fine details, and the brush size adjusts so you can handle both large areas and pixel-level edges.
Preparing Images for WhatsApp and Printed Programmes
Families usually need the same main portrait in more than one place: on the memorial page, in a WhatsApp link preview, and often in the funeral programme itself. That is why image preparation matters. A photo that looks acceptable inside a phone gallery can still fail when it is printed large or shared publicly.
Behind the scenes, TributePoint automatically:
- Resizes oversized images to a sensible maximum (no 40 MB uploads slowing down the page)
- Converts to WebP where the browser supports it, cutting file size by up to 40%
- Generates thumbnails for the gallery grid and dashboard cards
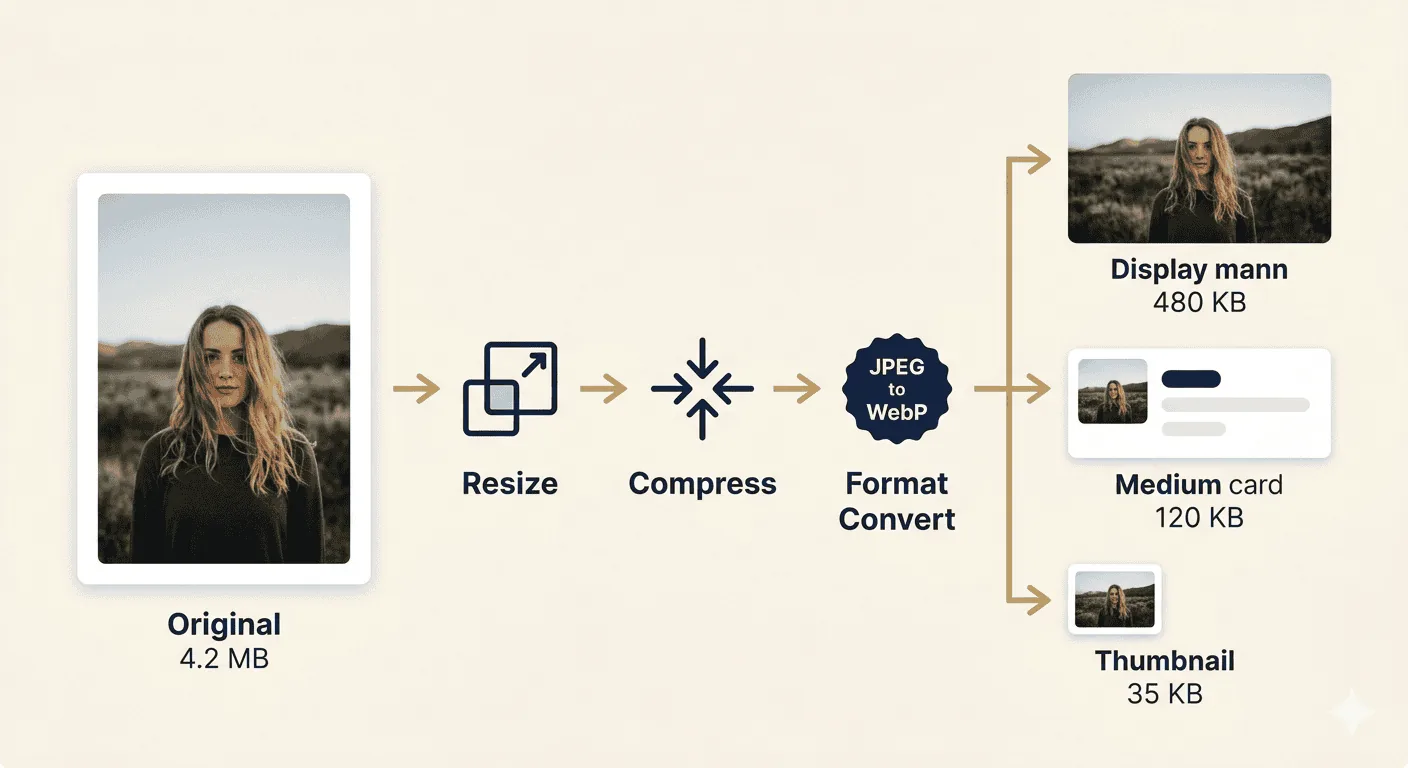
This means the memorial page loads quickly even on slower mobile connections — which is important for South Africa, where many visitors access the page on 3G or limited data. It also helps when the same photo will later be reused in a printed order of service or in a WhatsApp announcement.
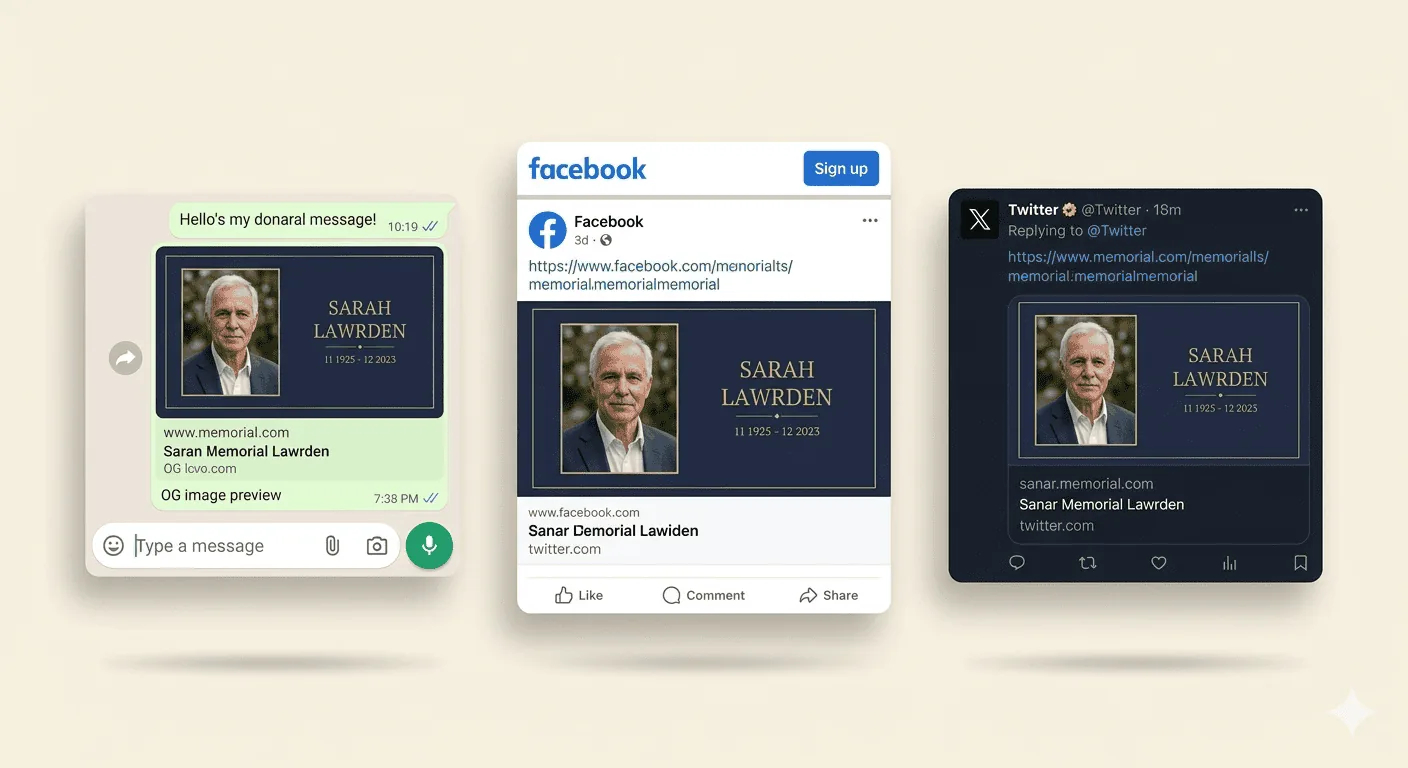
Preview & Social Images
TributePoint automatically generates two special images from the tribute’s main photo:
- Tribute Preview Image (630×900px) — a branded card used on the dashboard and in print layouts
- OG Image — the preview that appears when someone shares the tribute link on WhatsApp, Facebook, or Twitter
Both update automatically whenever you change the main photo or remove its background.
Tips for Choosing the Best Memorial Photo
The main photo on a memorial page is the first thing people see. Before they read the name, before they read the dates, they see that face. It appears in WhatsApp previews when the link is shared, it shows up on social media, and it is often printed in the funeral programme. Getting this photo right matters more than anything else on the page.
Use a recent photo. The main portrait should show the person as people actually remember them — not the 1998 wedding photo, not the baby picture. Childhood photos belong in the gallery. The main image needs to be recognisable to colleagues, church friends, and neighbours who knew the person as they were last year, not 30 years ago.
Go for natural light and real smiles. Studio portraits are fine, but the best memorial photos are often the ones nobody posed for — laughing at a braai, holding a grandchild, dancing at a wedding. Those photos capture who the person was in a way that a stiff, straight-faced portrait just cannot match.
Skip the filters and low-res screenshots. That photo someone saved from a WhatsApp group in 2019? It has been compressed to nothing. It will look blurry and pixelated as a full-width memorial portrait. Check the family's phone gallery instead — most phones keep the original high-resolution version even after a compressed copy was shared.
Think about culture. In some families, the memorial photo should show the person in traditional attire — Zulu isicholo or isidwaba, Xhosa isikhakha, Sotho seanamarena blanket. Other families prefer the church photo or the work ID picture. There is no universal right answer — ask the family what feels true to the person.
Digitising Old Printed Photographs
In many South African families — especially in rural areas and among older generations — photos exist only as physical prints. The wedding album from 1978. School portraits in a shoebox under the bed. That one framed photo on the mantelpiece that has been fading in the sun for 20 years. These are irreplaceable, and getting them into digital form means they can be shared, printed, and preserved forever.
Your phone is a decent scanner if you use it right. Put the photo on a flat surface near a window (natural light is best). Hold the phone directly above it — not at an angle, or the image will be warped. Do not use the flash; it creates a white glare on glossy prints. Take three or four shots and pick the sharpest.
Scanning apps do a much better job. Google PhotoScan, Adobe Scan, and Microsoft Lens are all free. They automatically find the photo's edges, fix the angle, and reduce glare. The difference between a scanning app and a raw phone camera shot is night and day.
For photos that really matter — the only picture of a grandparent, a damaged wedding portrait, a military service photo — take them to a print shop. Most shopping centres in South Africa have a store that will scan photos for R5–R15 each. It is worth the trip.
Once you have everything digitised, upload the photos in chronological order — childhood first, most recent last. It tells the whole story of a life from start to finish. Once your photos are ready, choose a memorial theme that complements them.
Get the Family Photos Into One Place
When you have found the portrait, scanned the older prints, and chosen what to share, a tribute page helps you organise it all in one place.
Start a TributeThe South African Reality of Finding Family Photographs
In our experience helping families build tribute pages, the photographs are almost never neatly stored in one place. They are scattered across three generations of devices and storage methods, and the family suddenly has 48 hours to pull them together. Below is what that actually looks like for most South African families — and what to do about it.
Where the Photos Usually Live
- The deceased's own phone — if you can unlock it. Recent photos and selfies, often the best portraits of their last few years.
- WhatsApp groups — family groups, church groups, stokvel groups. Birthday photos, holiday photos, group photos at funerals of other relatives. Often the highest-quality recent images.
- Facebook — profile pictures and tagged photos going back many years. Lower resolution but useful as references for what is missing.
- Old printed photographs — in cardboard boxes, biscuit tins, photo albums at gogo's house in Bizana or Giyani. Often the only surviving images of the person as a child or young adult.
- Studio portraits — particularly common for older South Africans. Black-and-white wedding photos from the 1960s and 1970s, school portraits, formal sitting-room photographs taken at PNA, Edgars Photo, or local township studios.
- An aunt or cousin's laptop — the family member who has historically been "the one with the camera." Always ask, even if you think you have everything.
Recovering Photographs From the Deceased's Phone
If the phone is locked and you do not have the PIN, do not factory-reset it — you will lose everything. For Android phones, if the person was signed into a Google account, the photos may already be backed up to Google Photos and accessible via that account on a computer. For iPhones, photos may be in iCloud. If the person used a local mobile network's cloud backup (Vodacom, MTN), check that too. As a last resort, mobile repair shops in most South African cities (R350–R900) can sometimes extract data from a locked phone if the screen is intact.
Scanning Old Printed Photographs at Home
You do not need a scanner. The free Google PhotoScan app (Android and iPhone) takes four overlapping shots of a printed photograph and stitches them into a clean, glare-free digital image. It takes about 20 seconds per photo. Lay the photographs out on a kitchen table in good natural light, and a single afternoon is usually enough to digitise an entire shoebox of family prints. If you have time, scan more than you think you need — you can choose later.
Restoring Damaged or Faded Photographs
South Africa's humidity, particularly along the KwaZulu-Natal and Eastern Cape coasts, is hard on old printed photographs. If your scans come out faded, yellowed, or cracked, free apps like Remini, MyHeritage Photo Enhancer and the open-source GFPGAN can restore faces and improve sharpness with surprising results. They are not perfect — sometimes they smooth out features too aggressively — so always keep the original scan in case you prefer it. For very precious or badly damaged photographs, professional restoration services in Johannesburg, Cape Town and Durban typically charge R150–R500 per image.
Choosing the Portrait Photograph
The single portrait photograph at the top of the tribute page is the one most people will remember. Some practical guidance from years of building these pages:
- Recent vs. iconic. A photograph from the last few years feels more honest. But for an elderly person who declined visibly in their last months, families often prefer a photograph from five to ten years earlier when they were still themselves.
- Look for eye contact. Photos where the person is looking towards the camera connect with viewers more strongly than profile shots.
- Check the lighting. Soft natural light from a window beats overhead fluorescent light every time. Avoid photos with strong shadows across the face.
- Crop generously. Leave space around the head — do not crop too tight on the face. The portrait will be displayed at different sizes.
- Resolution matters. A small WhatsApp-compressed photo will look pixelated on a desktop screen. If you only have a low-resolution image, consider using one of the AI restoration tools mentioned above before uploading.
Background Removal: When and Why
Background removal is most useful when the only good photograph of the person was taken at a busy event — a wedding, a Christmas gathering, a workplace function — and the background is distracting. Removing the background and placing the person against a neutral colour or soft gradient can transform a noisy snapshot into a usable portrait. We do not recommend using background removal on every photo — it can make a tribute feel artificial. Use it for the main portrait if needed, and leave the gallery photos as they are.
Curating the Photo Gallery
Most tribute galleries work best with 20–40 photographs, not 200. Quality matters more than quantity, and on slower mobile connections (particularly in rural areas), a smaller well-chosen gallery loads faster and is more likely to be viewed all the way through. Try to include a mix: childhood, youth, working life, family moments, and recent years. If the family is divided on which photos to include, set up a shared WhatsApp group or shared Google Drive folder so people can submit their own photos and the closest family members make the final choice.
Common Mistakes Families Make
- Forgetting to ask the in-laws. Photos from the spouse's family are often missing from the deceased's own collection. Ask early.
- Uploading screenshots of WhatsApp images. WhatsApp compresses images. Ask the original sender to share the photo via Google Drive, email, or the WhatsApp "send as document" option to keep full resolution.
- Including funeral or hospital photos in the gallery. Some families want these, but most viewers find them difficult. If you have such images, consider a separate private gallery for close family only.
- Removing photos that include people the family is no longer in contact with. The photo is still part of the deceased's life. Keeping it honours their full story.
Frequently Asked Questions
How many photos should I upload? Aim for 20–40 carefully chosen photos. You can always add more later as relatives send them in.
Can I add photos after the funeral? Yes. Tribute pages are not locked after the funeral. Many families keep adding photos for months as more come in. See our guide on keeping memories alive for more on this.
What about copyright on professional photos? If the photograph was taken by a professional photographer (wedding photos, school portraits), they technically own the copyright. In practice, almost no photographer objects to use on a memorial page, but it is courteous to credit them in the photo description if you know who they were.
Can I use photos from old social media accounts? Yes. Once a person has died, their family typically has the moral and practical right to use their photos for memorial purposes. Facebook also offers a memorialisation option that preserves the account and its photos for family access.
How do I share the page so all relatives can view the photos? See our guide on sharing a tribute with family far away.
Kabelo Ndlovu is TributePoint's Product Education Lead. He explains TributePoint's digital memorial, livestreaming, programme, donation, and funeral-home tools in clear, practical language for families and funeral professionals.
Also helpful: If the same portrait will also appear in the printed order of service, our funeral programme guide shows how families usually prepare those materials together.